I’ve always been fascinated by the simplicity and effectiveness of brining as a culinary technique. By applying this method, How To Brine Chicken Breast into a succulent and flavorful dish that’s sure to impress.
The struggle to achieve juicy chicken breasts is a common one, especially when cooking boneless, skinless breasts that tend to dry out quickly. However, with the right method, you can ensure that your chicken remains moist and tender, even when slightly overcooked.
By understanding the science behind brining chicken and applying a simple formula, you can consistently produce high-quality meat that’s full of flavor. This technique is not just a game-changer for special occasions but a reliable method for everyday meals.
Key Takeaways
- Brining chicken breasts guarantees tender and juicy results.
- The technique involves a simple scientific process that enhances moisture retention.
- Properly brined chicken remains delicious even when slightly overcooked.
- This method can be adapted for various recipes and cooking techniques.
- Mastering brining chicken elevates your culinary skills and ensures consistent results.
Why Brining Is the Secret to Perfect Chicken Breasts
The secret to perfectly cooked chicken breasts lies in the process of brining. Brining is a simple technique that transforms skinless chicken into a juicy and flavorful dish.
The Problem with Boneless Skinless Chicken Breasts
Boneless skinless chicken breasts are prone to drying out due to their lean nature and lack of protective skin or bones. This makes them challenging to cook without losing their natural juices and flavor.
- Lack inherent flavor
- Tend to dry out quickly during cooking
- Have no natural protection against heat
How Brining Transforms Your Chicken
Brining chicken breasts involves soaking them in a saltwater solution, which enhances their ability to retain moisture. Through osmosis, salt penetrates the meat, improving its texture and flavor.

- Helps proteins retain moisture
- Adds flavor throughout the meat
- Results in tender meat with improved texture
The Science Behind Brining Chicken
The magic behind brining chicken breasts lies in the science of osmosis and salt penetration. Brining is a process that not only adds flavor but also significantly enhances the moisture content of the meat.

How Osmosis Makes Chicken Juicier
Osmosis plays a crucial role in the brining process. When chicken breasts are submerged in a brine solution, the salt concentration outside the cells is higher than inside. This disparity causes water to move into the cells through osmosis, increasing the moisture content within the meat. The salt in the brine also helps to break down some of the protein structures, creating spaces that can trap moisture, resulting in juicier breasts after cooking.
This scientific process is why brined chicken can retain up to 10% more moisture compared to unbrined chicken. The result is a more tender and flavorful final product.
Brining vs. Marinating: Understanding the Difference
Many people confuse brine with marinade, but they work differently. While a marinade primarily flavors the surface of the chicken, a brine penetrates deeper into the meat, enhancing both flavor and moisture retention. The salt in the brine is key to this process, making it an essential component for achieving tender and juicy chicken breasts.
What You’ll Need for a Basic Chicken Brine
To create a basic chicken brine, you’ll need a few simple ingredients that work together to enhance the flavor and moisture of your chicken breasts.
Essential Ingredients
The foundation of any chicken brine is water and salt. For a simple brine, use 1 tablespoon of salt for every 1 cup of liquid. I prefer using kosher salt because it dissolves easily and doesn’t contain additives that might affect the flavor. You can use water or substitute part of it with chicken broth for added depth.
Optional Flavor Enhancers
Beyond the essentials, you can enhance your brine with various ingredients. Consider adding slices of citrus fruits like lemons or oranges, fresh herbs such as thyme or rosemary, smashed garlic cloves, or a few peppercorns to give your breasts extra flavor. These ingredients can make a significant difference in the final taste of your chicken.
How to Brine Chicken Breast: Step-by-Step Instructions
To achieve moist and tender chicken, follow these easy steps for brining chicken breasts. Brining is a simple process that significantly enhances the quality of your cooked chicken.
Preparing Your Brine Solution
Start by warming 2 cups of water on the stovetop in a pot; the goal is to warm it enough to dissolve the salt properly, not to bring it to a simmer. Add 33 grams of salt (about 2 tablespoons of kosher salt) to the warm water and stir until it’s completely dissolved. Once the salt has dissolved, remove the pot from the heat.
Next, add 2-4 cups of cold water to cool down the brine. You can speed up the cooling process by adding a handful of ice. It’s crucial that the brine is cool before you add the chicken breasts to prevent premature cooking.
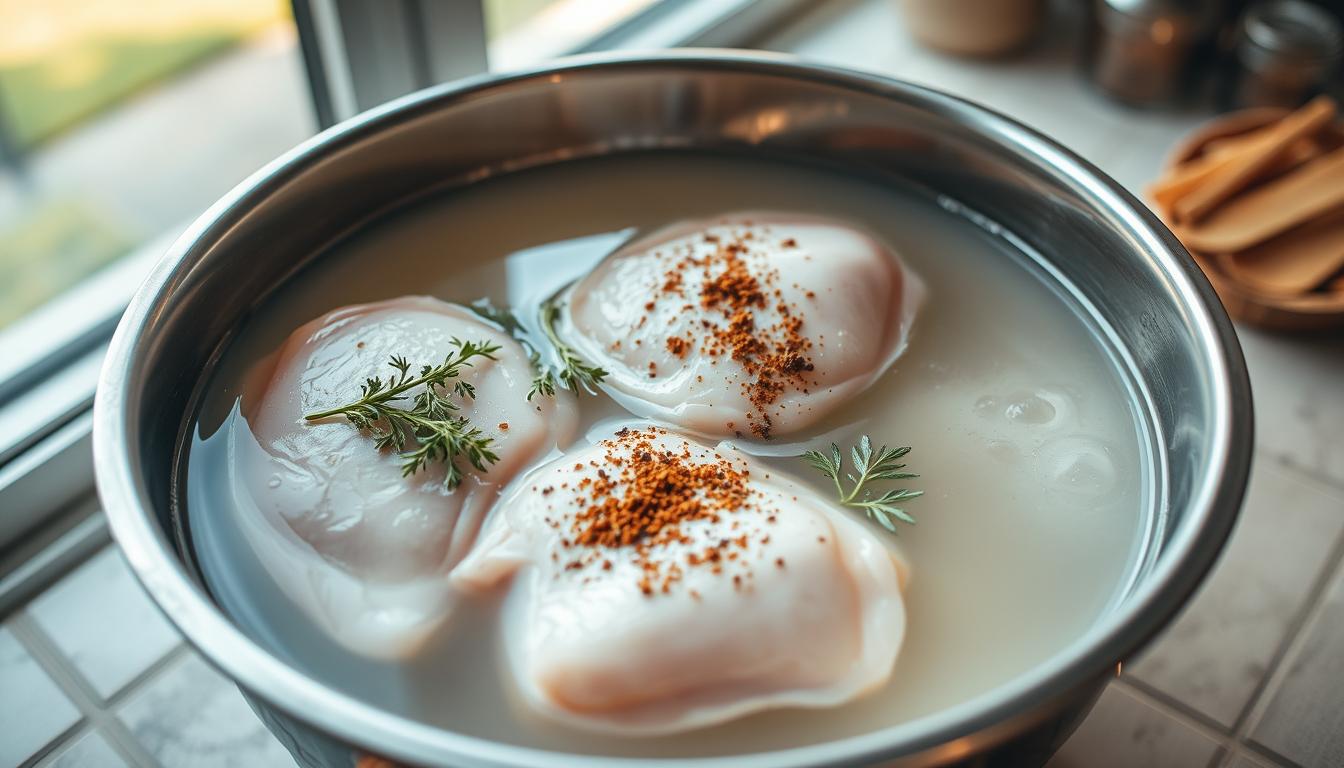
Submerging the Chicken
For submerging the chicken, I recommend using a gallon-sized ziplock bag placed in a bowl for support. This setup allows the brine to completely surround the chicken breasts, ensuring even distribution of flavor and moisture. Place the chicken breasts in the brine, making sure they are fully submerged.
Brining Time: How Long Is Just Right
The optimal brining time for boneless chicken breasts is between 30 minutes to 1 hour. This duration provides the perfect balance of moisture and flavor. Be cautious not to over-brine, as this can result in an unpleasant texture. I never brine chicken breasts for more than 2 hours.
Rinsing and Drying After Brining
After brining, carefully rinse each chicken breast under cold running water to remove excess salt from the surface. Then, pat the chicken breasts thoroughly dry with paper towels before cooking. This step is essential for achieving proper browning and searing.
By following these steps, you can significantly improve the quality of your cooked chicken, achieving moist and tender results with minimal active time.
My Favorite Chicken Brine Recipe
My journey with chicken brine recipes has led me to develop a few go-to methods that consistently deliver moist and flavorful chicken breasts. Over the years, I’ve refined these recipes to ensure they’re both effective and easy to prepare.
Basic Salt Water Brine
For a simple yet effective brine, mix 4 cups of water with 4 tablespoons of kosher salt for 2 chicken breasts. Dissolve the salt in warm water, then cool it down before use. This basic brine is perfect for everyday cooking when you want juicy chicken without much fuss.
Herb and Citrus Infused Brine
To elevate your chicken game, try an herb and citrus infused brine. Add slices of a citrus fruit, 2 smashed garlic cloves, and a handful of fresh herbs like rosemary or thyme to the basic brine. The citrus adds a bright, subtle flavor that complements the chicken beautifully.
Quick Pickle Juice Alternative
For a quick alternative, use pickle juice as a brine. Simply pour the juice from a jar of dill pickles over your chicken breasts and refrigerate for 30 minutes. The acidity and salt content make for deliriously moist chicken.
Tips for Brining Success
To achieve perfectly brined chicken breasts, it’s essential to follow a few key guidelines. Brining is a simple yet effective technique for ensuring moist and tender chicken breasts. By paying attention to a few crucial details, you can elevate your cooking and achieve consistently delicious results.
Choosing the Right Container
The container you use for brining chicken breasts matters significantly. I prefer using a gallon-sized ziplock bag as it requires less brine and ensures full contact with the meat. For multiple breasts, a large glass or food-grade plastic container works well, but ensure it’s not reactive.
Keeping Food Safety in Mind
Food safety is paramount when brining: always keep the chicken refrigerated during the entire brining process, never at room temperature. After handling raw chicken, thoroughly clean all surfaces, containers, and tools with hot soapy water to prevent cross-contamination. I always disinfect my sink after rinsing brined chicken breasts to maintain proper kitchen hygiene.
Adjusting Brine for Multiple Chicken Breasts
When brining larger quantities, increase your brine solution by 1-2 cups of water and 1 tablespoon of salt for each additional chicken breast. For bone-in chicken breasts, extend the brining time to 2-3 hours, as the bone slows down the penetration of the brine. Skinless, boneless breasts should be marinated for at least 30 minutes and no longer than 2 hours.
Common Brining Mistakes to Avoid
The key to perfect chicken breasts lies in avoiding common brining mistakes. Even experienced cooks can fall into bad habits that affect the final result.
Over-Brining Your Chicken
Over-brining can lead to an unpleasant texture. I’ve seen many home cooks leave chicken breasts in the brine for hours, when 30-60 minutes is optimal. Over-brined chicken develops a spongy texture.
Using the Wrong Salt Measurements
Using the wrong type of salt or measurements can result in chicken that’s too salty or not brined effectively. Table salt is nearly twice as salty by volume as kosher salt, so it’s crucial to specify which type to use.
Skipping the Rinse Step
Skipping the rinse step after brining can result in overly salty chicken breasts. I always rinse thoroughly under cold running water to remove excess salt.
Conclusion: Elevate Your Chicken Game with Brining
Brining has revolutionized my approach to cooking chicken breasts, making it a staple in my kitchen. By incorporating this simple technique into your cooking routine, you’ll achieve consistently juicy and flavorful results. Whether you’re grilling, pan-searing, or baking, brining works universally across cooking methods.
I’ve found that even a quick 30-minute brine makes a noticeable difference. With its versatility and effectiveness, brining chicken is sure to elevate your chicken dishes and boost your confidence in the kitchen.